Member Registration
Welcome to a simplified member experience! New members will be able to sign up easily, make payments, and manage their own accounts – all of which can be done conveniently online, anytime, and on any device. Their data will automatically sync to the GHIN system.
Check out the sections below for member experience and membership set-up options:
General
Switching from calendar year to join date
Payment reminders and lapsing members
Check out the sections below for member experience and membership set-up options:
General
- New members
- Collecting an offline payment for a new member
- Existing members
- New members without GHIN number
- Email already in use
- Reactivating lapsed members
- Deleting lapsed members
Switching from calendar year to join date
Payment reminders and lapsing members
New members
To join a club, people can visit NCGA.org and click on various links to join a specific club.
To join a club, people can visit NCGA.org and click on various links to join a specific club.
- They will be directed to a page where they should click the Join Now link.
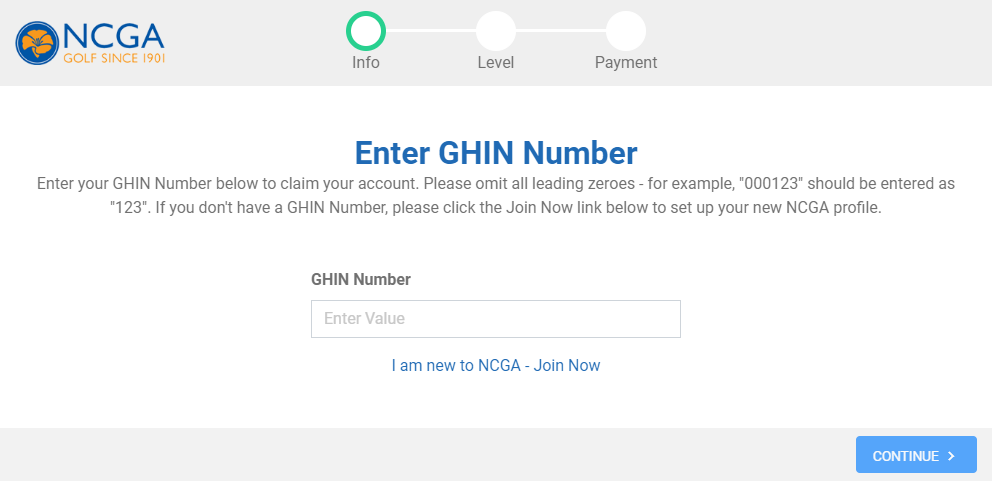
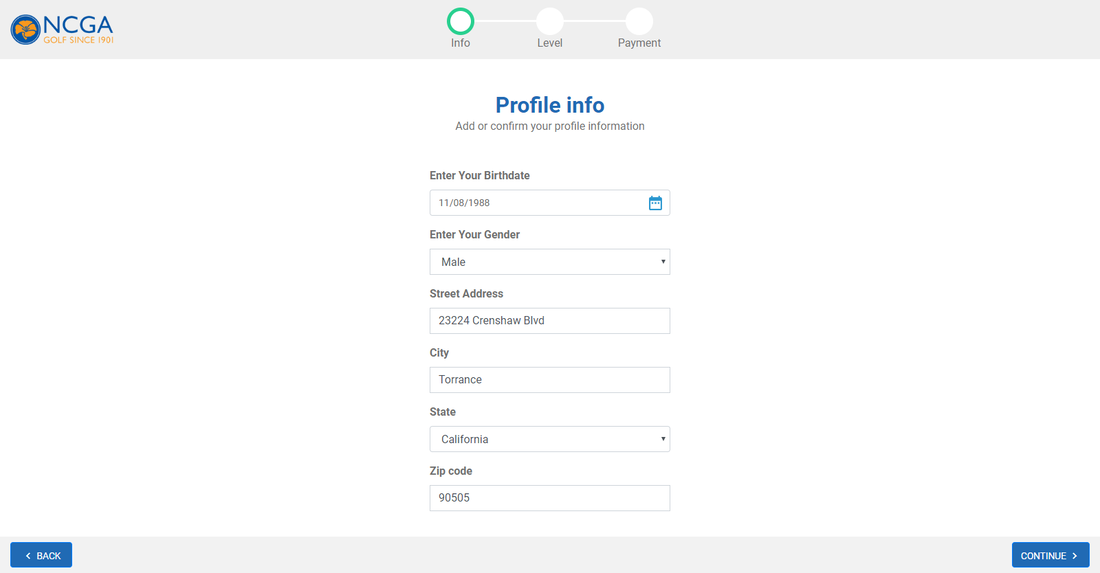
2. The new member registration process will require them to enter their info to create a new account
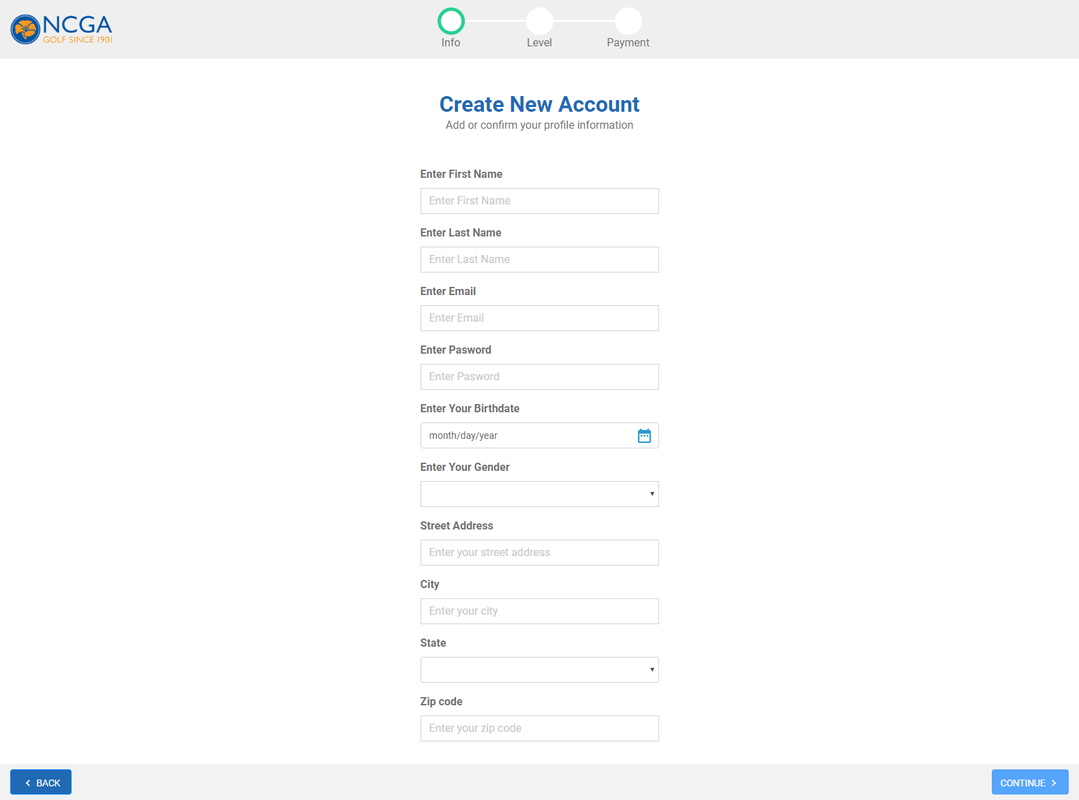
3. After members have entered their information, they will be prompted to select a membership level
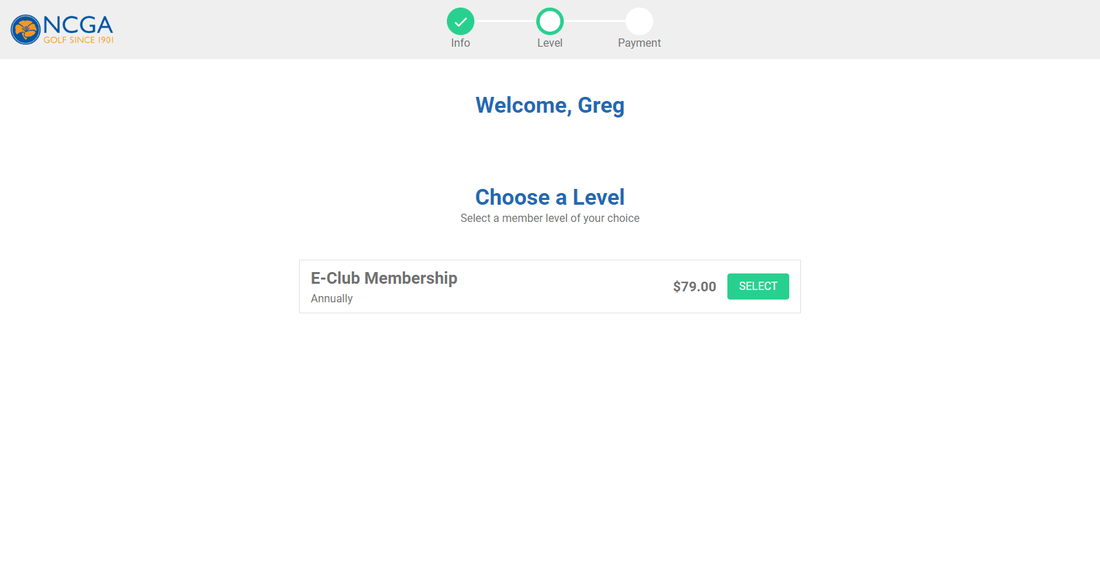
4. They will then be able to choose a payment method and select whether they want to automatically renew membership
Pay with card:
Pay with card:
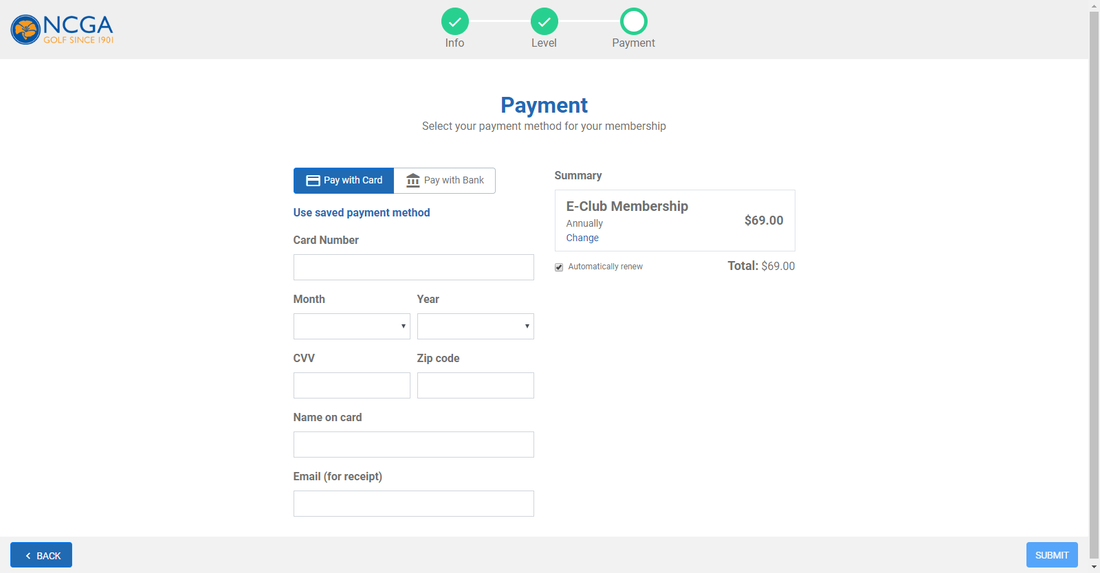
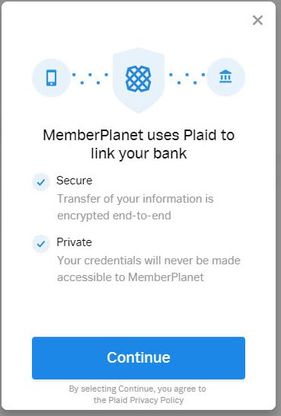
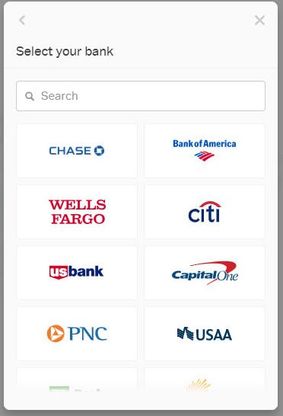
Pay with bank:

If users select Pay With Bank, they can have the option to search and easily link their bank account.
|
|
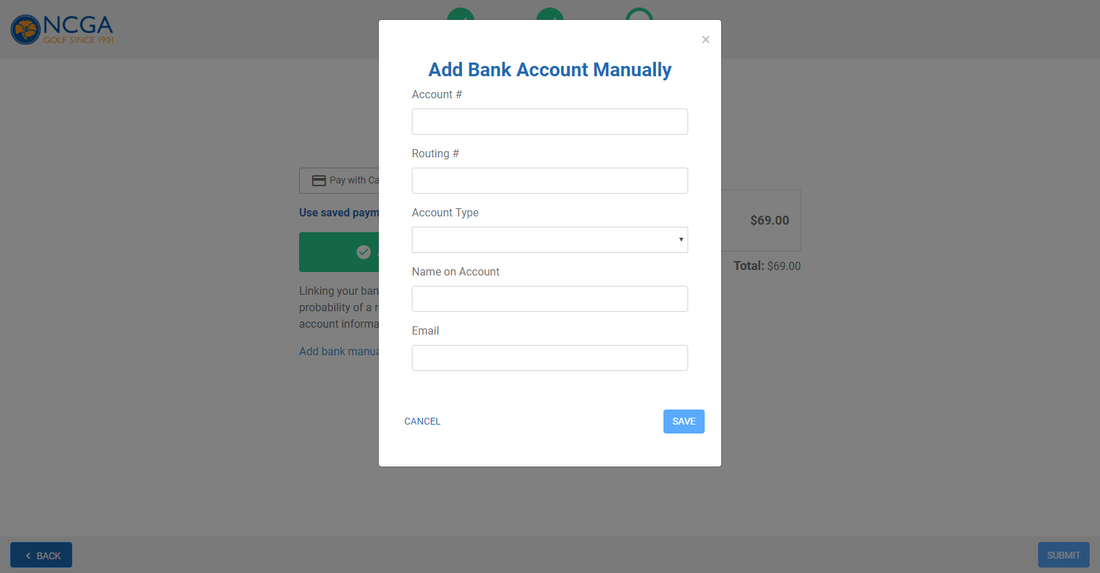
If members select the Add Bank Manually link, a pop-up screen will appear wherein they can securely add their bank details:
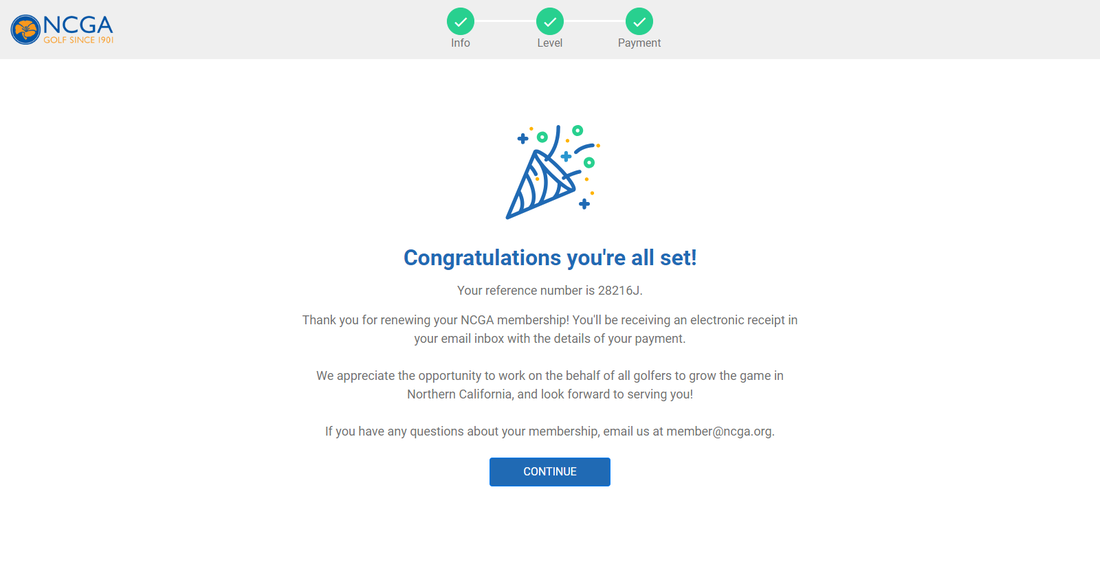
5. After submitting their payment, they will be taken to a confirmation screen with their reference number
Clicking the Continue button will take members to their member dashboard.
Clicking the Continue button will take members to their member dashboard.
- After a member has completed registration, a GHIN number will be generated (if they do not already have one). A confirmation email will be sent to the primary email address with the number.
Collecting an offline payment for a new member
A club admin can collect and record an offline payment from a new member as long as they have the person’s member info: first and last name, email address, date of birth, and address.
A club admin can collect and record an offline payment from a new member as long as they have the person’s member info: first and last name, email address, date of birth, and address.
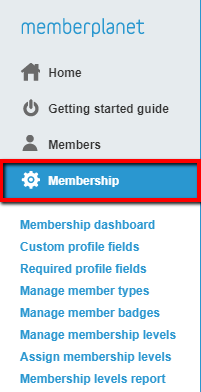
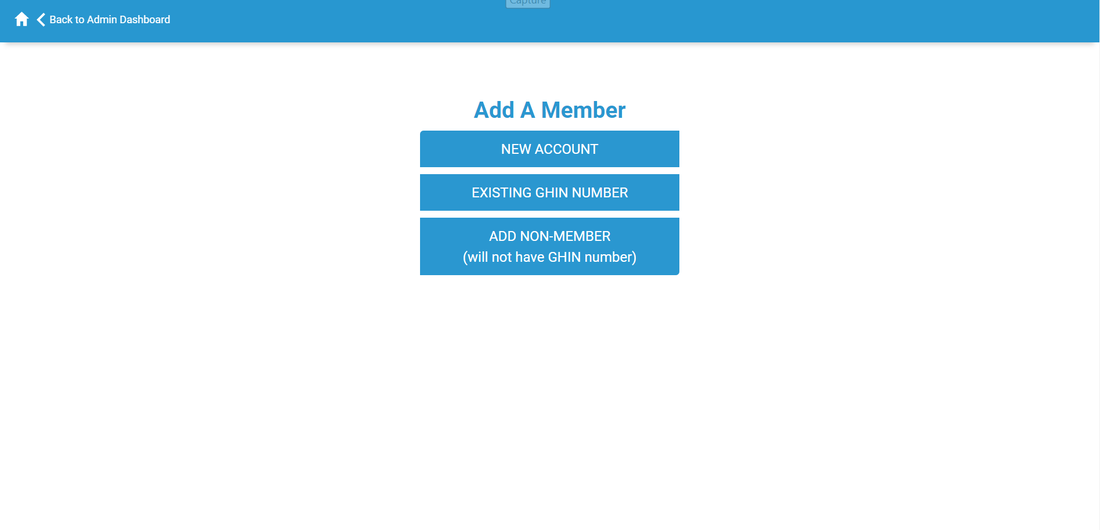
- In the memberplanet admin portal, click Members in the left nav bar

2. Select Add Members from the submenu
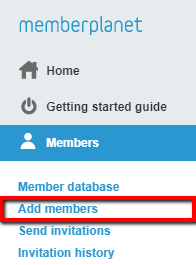
3. On the Add New Members section, click the Get Started button
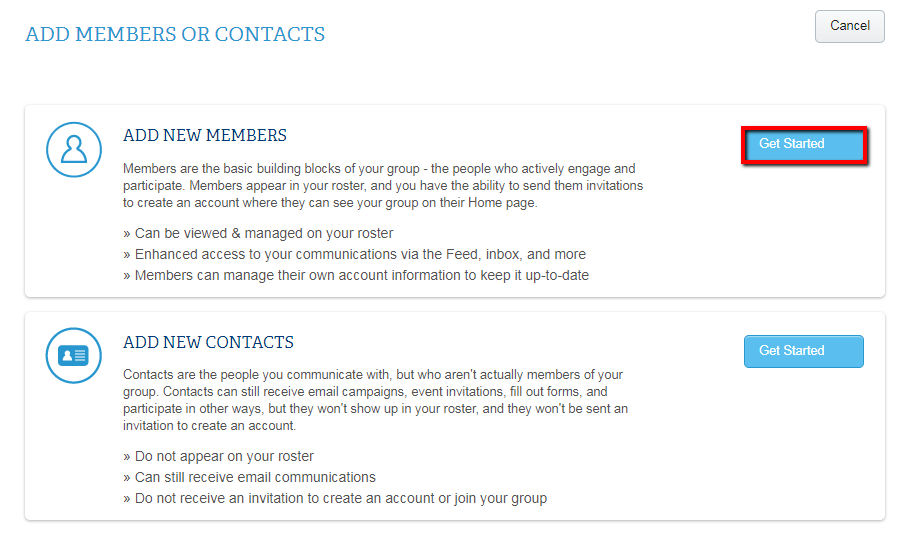
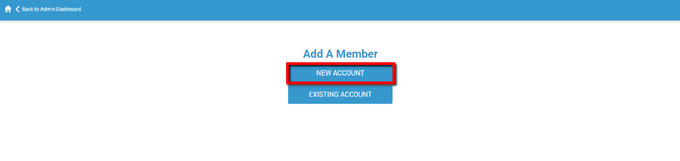
- You will be directed to the process to create a new account for a member.
5. Enter in the member information and click Continue in the bottom right

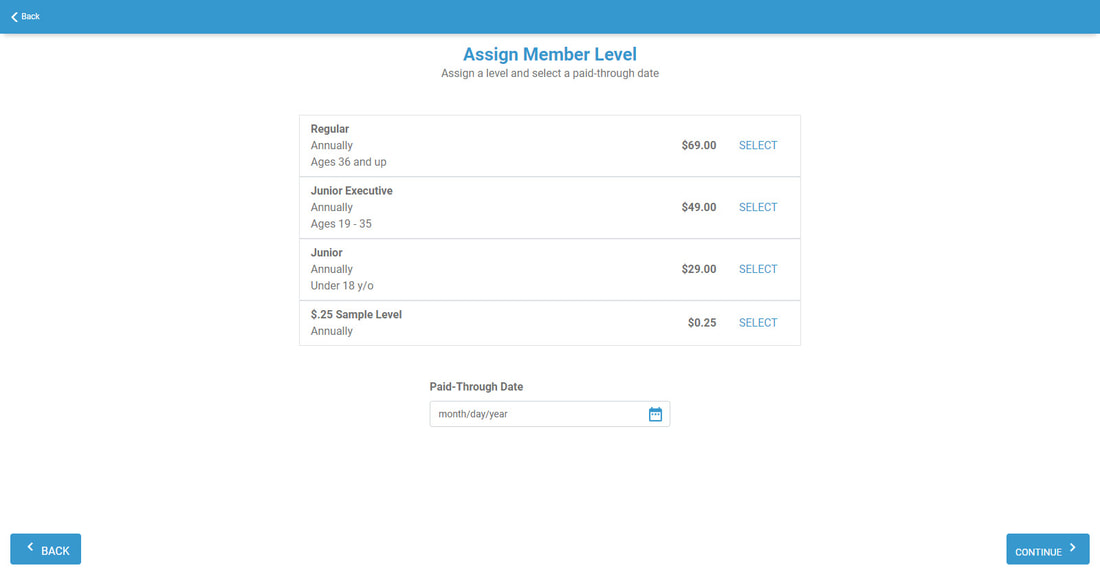
- The next screen will display your membership levels and allow you to select a paid-through date. If you do not have any member levels displayed, please contact support.
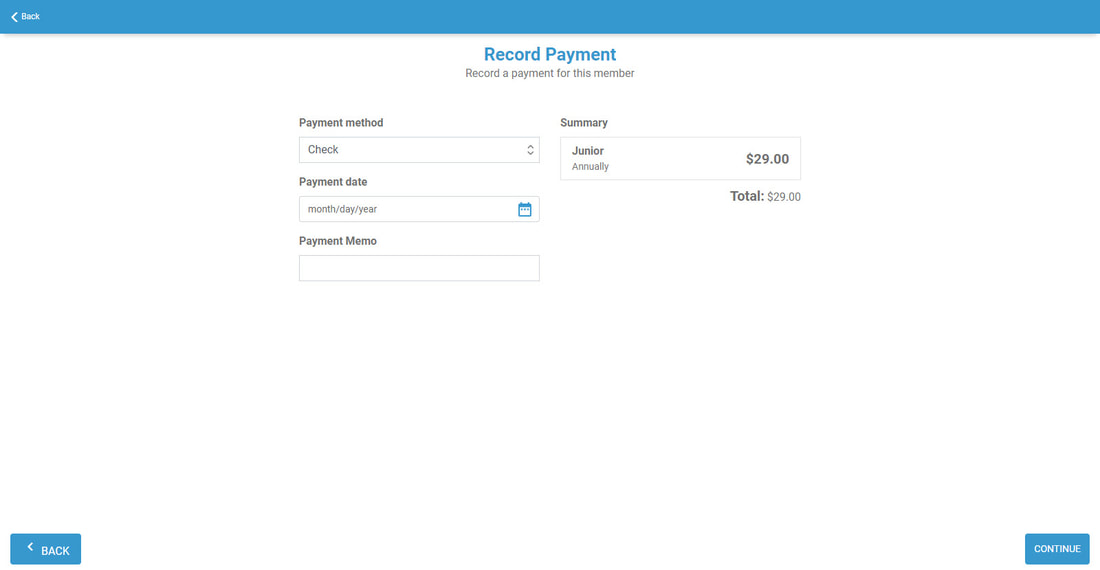
7. Record the member payment by selecting the payment method, and payment date, then clicking Continue
- If you need to go back and correct the membership level selected, click the Back button on the bottom left instead of using your browser controls.
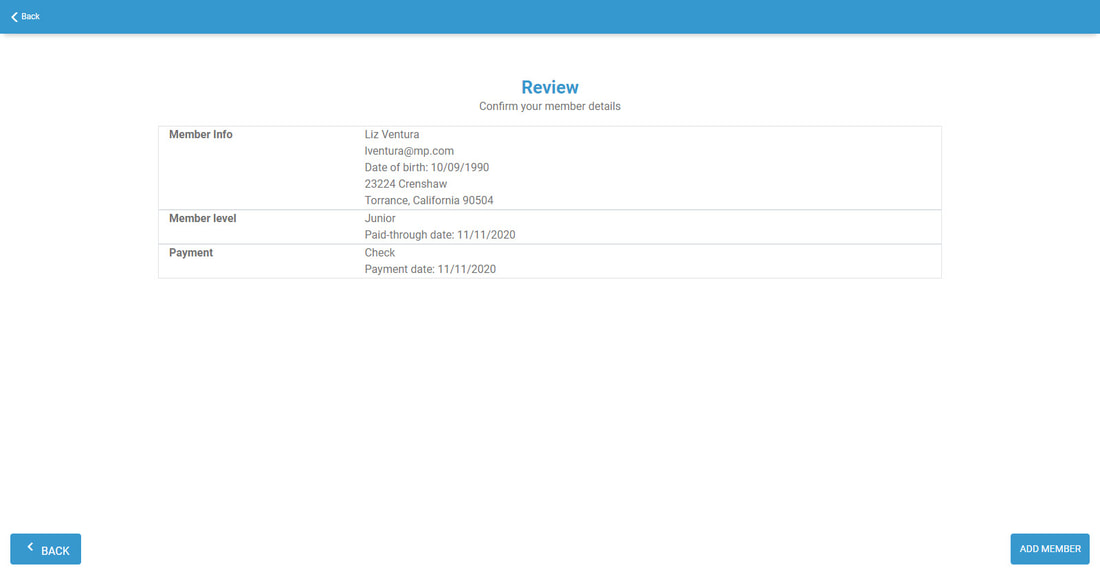
8. Confirm the member details and click Add Member on the bottom right
Existing members
Through our partnership, your club's member accounts have been created and pre-populated in your group. Your existing members will receive automated email reminders to renew, and they’ll also have the opportunity to renew their membership by visiting NCGA.org and clicking any of the various registration links.
1. Existing members will be prompted to enter their GHIN number on the first screen

2. If they entered in their GHIN number correctly, they will be prompted to enter a payment method (pay with card - new or saved method, or pay with bank) for their membership level and select whether they want to automatically renew membership

3. After submitting their payment, they will be taken to a confirmation screen with their reference number
Clicking the Continue button will take members to their member dashboard.
Clicking the Continue button will take members to their member dashboard.

Ability to add non-members (who do not have a GHIN number)
Sometimes you might have members you want to add but they are non-paying members or admins.
Sometimes you might have members you want to add but they are non-paying members or admins.
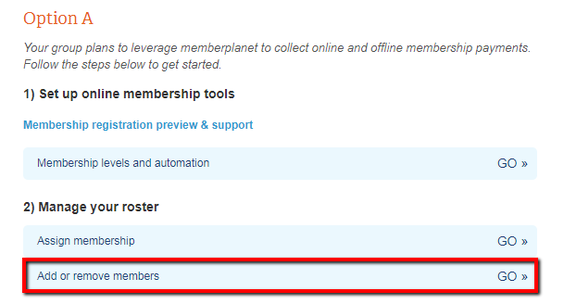
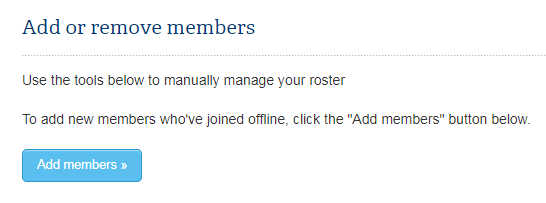
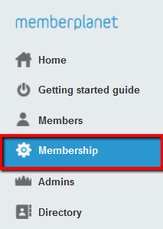
- On the left navigation sidebar, click Membership
2. On your membership dashboard, select Add or Remove Members under Option A or B
3. Click Add Members
4. Select Add Non-Member (will not have GHIN number)
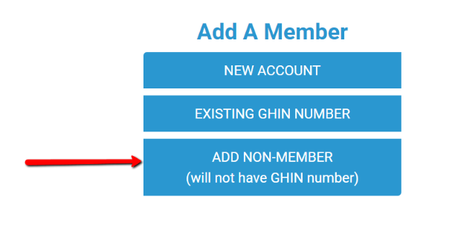
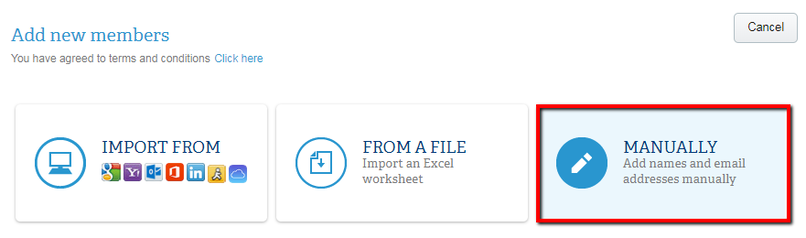
5. Click Manually
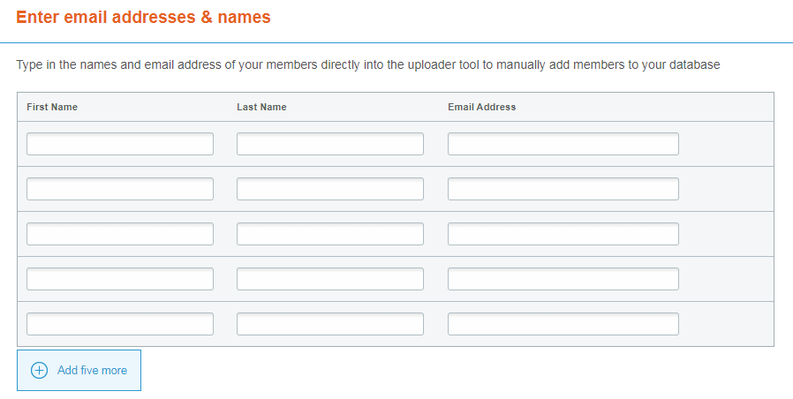
6. Enter first name, last name, and email address for all records
- Add more records by clicking Add Five More
7. Click Add Members at the bottom right to add members manually

Email already in use
1. During the registration process for a new or existing member, if our system identifies that an email submitted is already in use, a pop-up will appear prompting the member to select Verify My Account or Use a Different Email
1. During the registration process for a new or existing member, if our system identifies that an email submitted is already in use, a pop-up will appear prompting the member to select Verify My Account or Use a Different Email

2. If the member selects Verify My Account, a password reset and verification code will be sent to the email on file
Sample email with verification code:
Sample email with verification code:
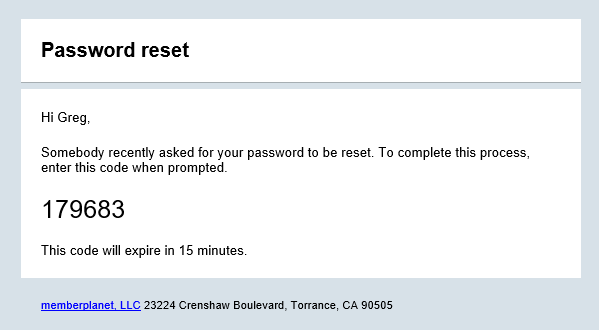
The member should retrieve the code from their email, paste it into the provided field, and create a password for the account.

3. After submitting the verification code and password, the member will be taken through the rest of the confirmation process for their profile information
4. After submitting their profile info, they will be prompted to enter a payment method (pay with card - new or saved method, or pay with bank) for their membership level and select whether they want to automatically renew membership

5. After submitting their payment, they will be taken to a confirmation screen with their reference number
Clicking the Continue button will take members to their member dashboard.
Clicking the Continue button will take members to their member dashboard.

|
Reactivating lapsed members
If you have a lapsed member in your club that is rejoining, you’ll need to change his/her membership status from Lapsed to Joined.
If you’re utilizing online membership functionality (Option A under Membership in your admin portal) in memberplanet, this can be accomplished by assigning a membership level to the person.
If you’re doing basic membership (Option B under Membership in your admin portal), log in to your memberplanet admin portal and follow these steps:
- In the left navigation sidebar, select Members

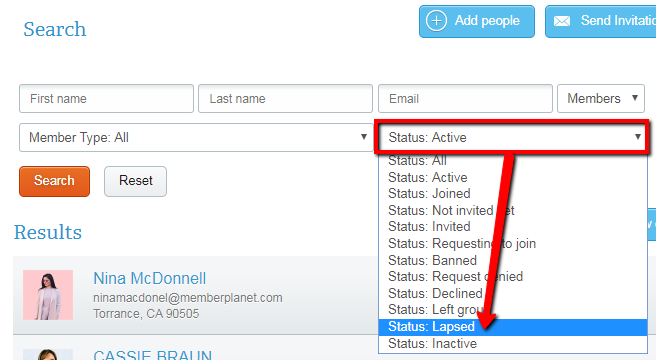
2. Utilize the search options at the top of the page to find the lapsed member
- Enter a name and set the Status dropdown menu to Lapsed.
3. When you find the member record, select the gear icon on the right-hand side
4. In the dropdown menu, click Change Status to Joined
4. In the dropdown menu, click Change Status to Joined
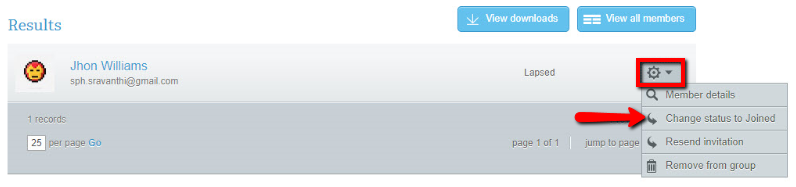
The member’s status will be changed to Joined.
Deleting lapsed members
To delete a lapsed member from your member database, complete the following steps from your admin portal:
To delete a lapsed member from your member database, complete the following steps from your admin portal:
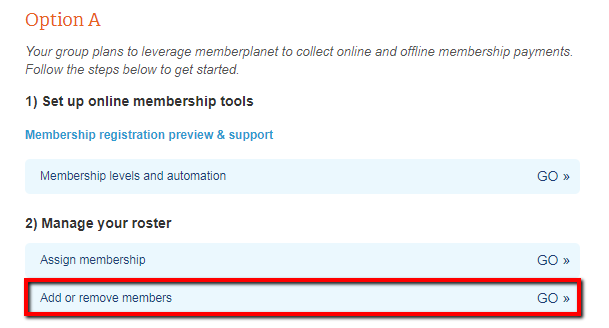
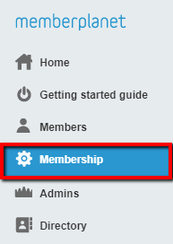
- Select Membership in the left navigation sidebar

2. On your membership dashboard, click Add or Remove Members under Step 2
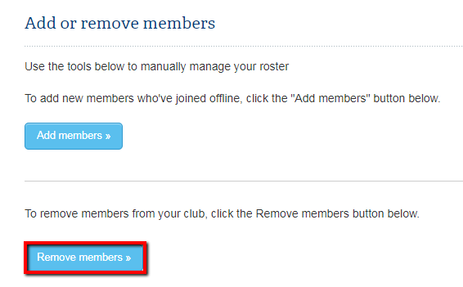
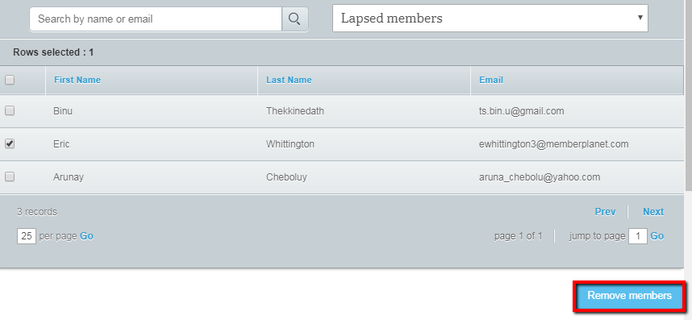
3. On the following page, select Remove Members
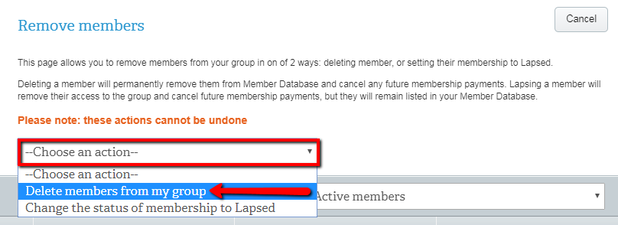
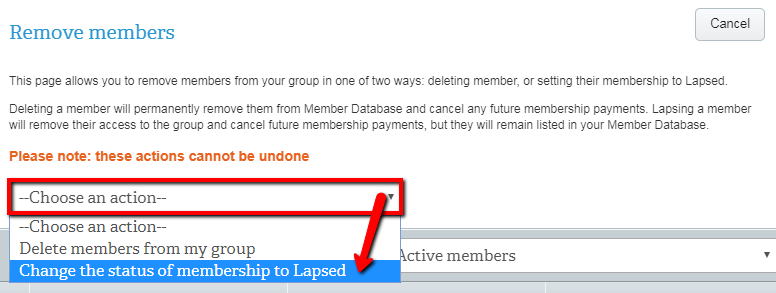
4. From the Choose an Action dropdown, select Delete Members from My Group
5. Set the filter to Lapsed Members
- Member records with a lapsed status will be displayed.

6. Select the checkbox next to the member’s name you wish to delete
7. Click the Remove Members button at the bottom, right-hand side
7. Click the Remove Members button at the bottom, right-hand side
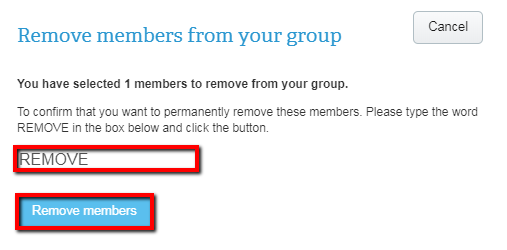
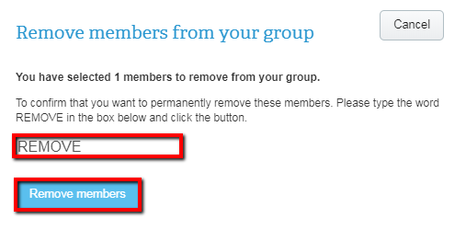
8. Confirm your selection on the next screen by typing in REMOVE in the text box, then clicking the Remove Members button
The member record(s) you have selected will be deleted from your member database.
Selecting a renewal period
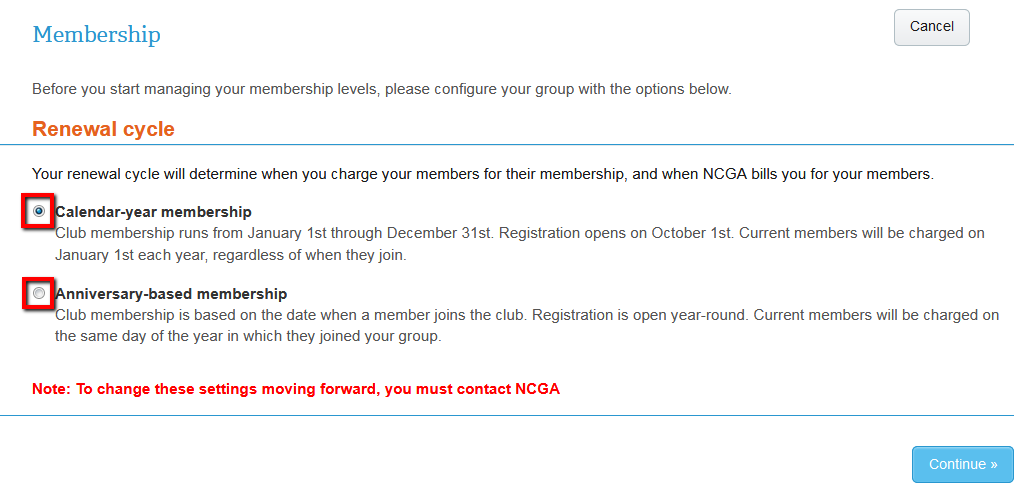
Setting up membership based on join date has many benefits – a major one is that your club can offer memberships and collect dues all year long! Golfers can join any time and receive benefits for an entire year. They will automatically be reminded via email to renew before their anniversary from joining. The only caveat is that once you switch from a calendar-year membership to a join-date model, you can’t switch back. If golfers sign up for membership based on join date, it’s considered a very poor member experience (as well as complicated for admins) to switch them to a calendar-year membership, as this will modify their payment schedules.
Note: If your club has already set up your renewal period, and would like to make a change, you will need to contact NCGA at [email protected]
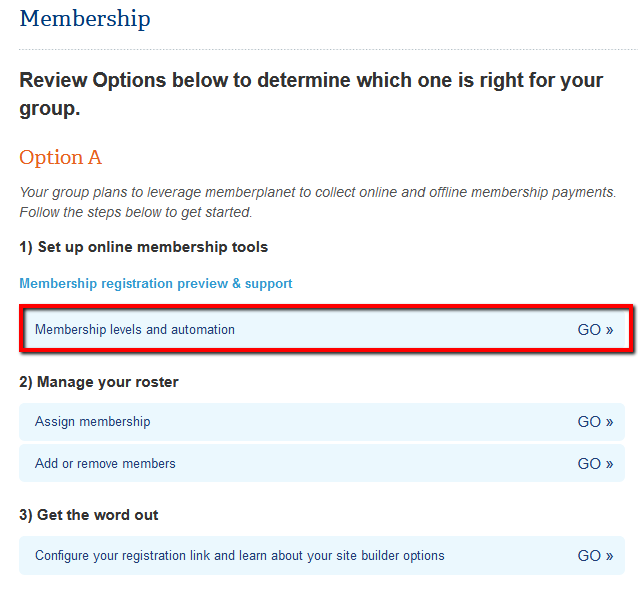
- In the memberplanet admin portal, click Membership in the left nav bar
2. On your membership dashboard, click Membership Levels and Automation.

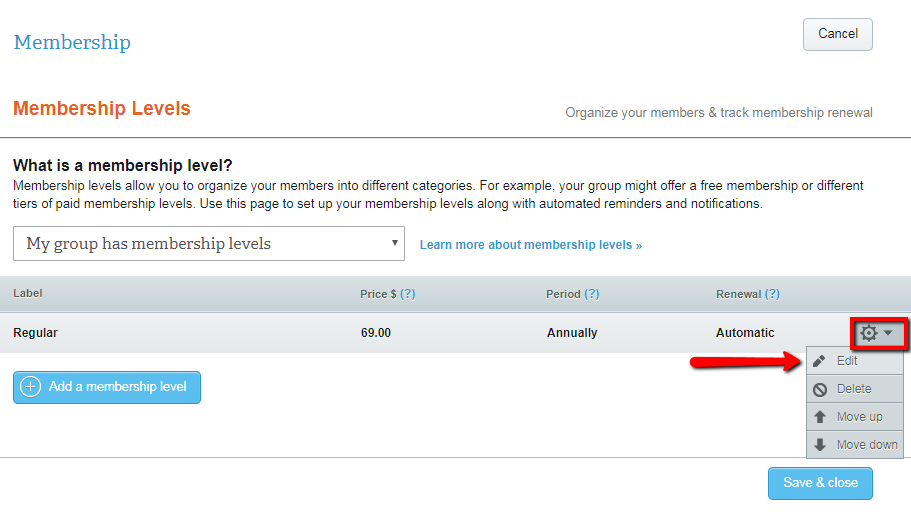
- Your membership renewal cycle will display on the following page.
4. Select Continue once you have completed your selection
5. On the proceeding page, select Save & close, to complete your update.
5. On the proceeding page, select Save & close, to complete your update.
Payment reminders and lapsing members
Club admins can add a late renewal fee if a member lapses. This can also be turned on and off.
We recommend setting up renewal and grace period reminders:
Club admins can add a late renewal fee if a member lapses. This can also be turned on and off.
We recommend setting up renewal and grace period reminders:
- In the memberplanet admin portal, click Membership in the left nav bar

2. On your membership dashboard, click Membership Levels and Automation.
- Your membership levels will be displayed.
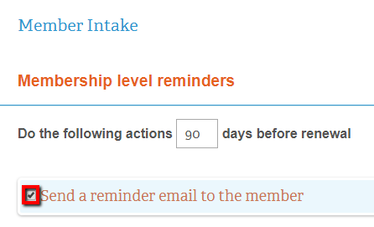
- In the Reminders section, you have the option to enable up to three email reminders, and we recommend enabling all three.

5. Click on the text boxes and change 14 to 90 days before renewal, and change 7 to 30 days before renewal

6. Select the checkbox next to Send a Reminder Email to the Member on all three reminders
- The emails will appear to allow you to make edits.
7. At the bottom, click the Save & Close button
To automatically change a member to lapsed status after the grace period:
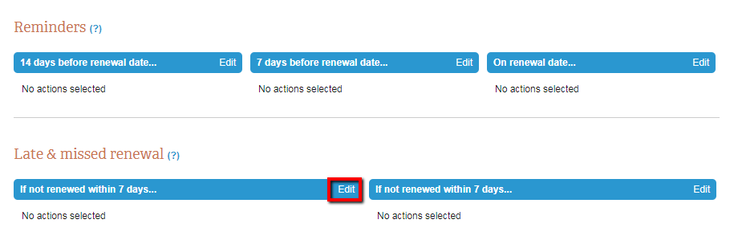
Follow steps 1-4 above to navigate to the membership level you wish to edit. In the Late & Missed Renewal section, you have the option to enable up to two actions, and we recommend enabling both.
Follow steps 1-4 above to navigate to the membership level you wish to edit. In the Late & Missed Renewal section, you have the option to enable up to two actions, and we recommend enabling both.
- Select Edit next to If Not Renewed Within 7 Days
2. Select the checkbox next to Send an Email Reminder to the Member
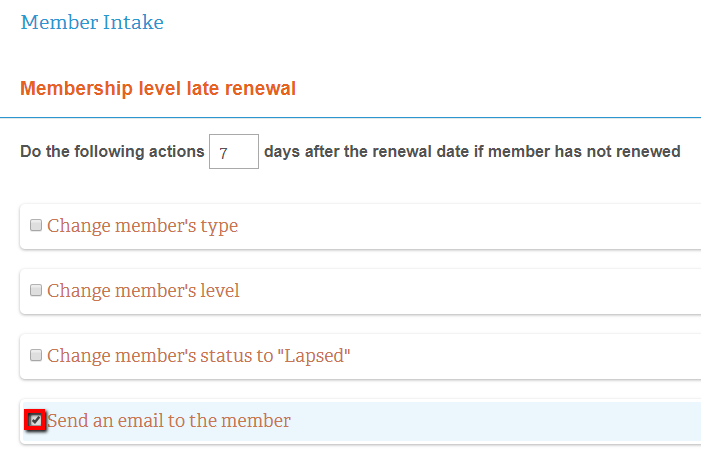
3. At the bottom, click the Save & Close button
4. Select Edit for the other If Not Renewed Within 7 Days
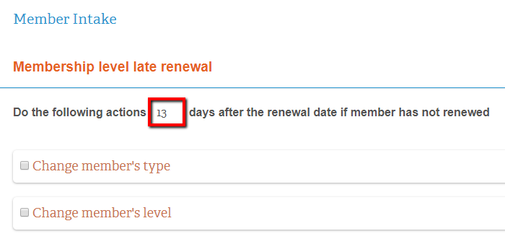
4. Select Edit for the other If Not Renewed Within 7 Days

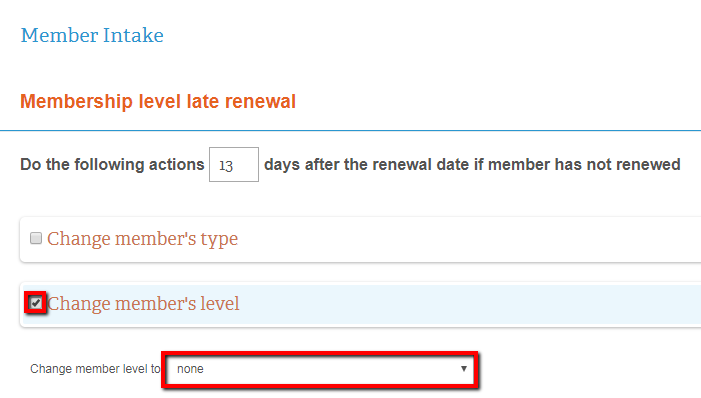
5. Change 7 days to 13 days after the renewal date if member has not renewed
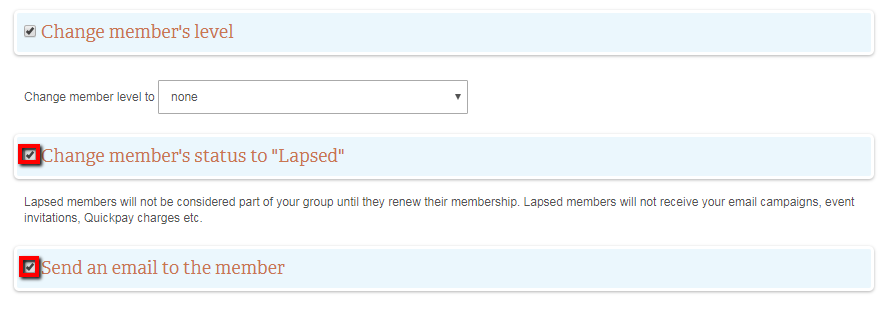
6. Select the checkbox next to Change Member’s Level and set the dropdown to None
7. Select the checkboxes next to Change Member’s Status to “Lapsed” and Send an Email Reminder to the Member
- In the email that appears for you to make edits, we recommend adding text similar to: You are no longer an active club member. If you decide to join at a later date, you may be subject to a late renewal fee.
To manually change a member record to lapsed status:
- Select Membership in the left navigation sidebar
2. On your membership dashboard, click Add or Remove Members under Step 2) Manage Your Roster

3. On the following page, select Remove Members

4. From the Choose an Action dropdown, select Change the Status of Membership to Lapsed
5. Select the checkbox next to the record/records that needs to be set to Lapsed
6. Click the Remove Members button at the bottom of the page
6. Click the Remove Members button at the bottom of the page

7. Confirm your selection on the next screen by typing in REMOVE in the textbox displayed, then select Remove Members
Support© 2020 memberplanet, LLC. ALL RIGHTS RESERVED.
|
|